Introduction
This guide explains how one can design a safe and efficient portable battery rack ventilation system for tiny shelters. It covers assessment of power needs, selection of ventilation methods, construction of a sturdy frame, and integration of essential tools. By following the steps, the reader will create a reliable power storage solution that mitiges overheating and fire risk. The information is valuable for DIY enthusiasts, off‑grid campers, and small‑space builders who need dependable energy on the move.
What You'll Need
- Heavy‑duty battery rack such as the SUNGOLDPOWER 5‑Layer Server Rack
- Adjustable battery tray like the Wyckoff Adjustable Battery Tray
- Tool organizer wall mount – POKIPO Tool Organizer Wall Mount
- Ventilation components (mesh grilles, small fans, silicone grommets)
- Mounting hardware (bolts, washers, stainless‑steel brackets)
- Basic hand tools (drill, screwdriver, level, measuring tape)
Step 1: Assess Power Requirements and Space Constraints
Begin by calculating the total amp‑hour capacity required for the intended usage period. Add a safety margin of at least 20 percent to accommodate temperature‑related capacity loss. Measure the interior dimensions of the shelter, noting any obstructions such as windows or doors that could limit rack placement. This assessment determines the size of the rack and the amount of ventilation air flow needed to keep batteries within their optimal temperature range.
Step 2: Choose an Appropriate Ventilation Strategy
Two common strategies are passive venting using mesh grilles and active venting with low‑profile fans. Passive venting relies on natural convection; it is quiet and requires no power, but it demands sufficient opening area. Active venting provides controlled air movement, useful in tightly sealed shelters where convection is limited. For most tiny shelters, a hybrid approach—mesh grilles on the top and a 12 V fan at the rear—offers the best balance of simplicity and performance.
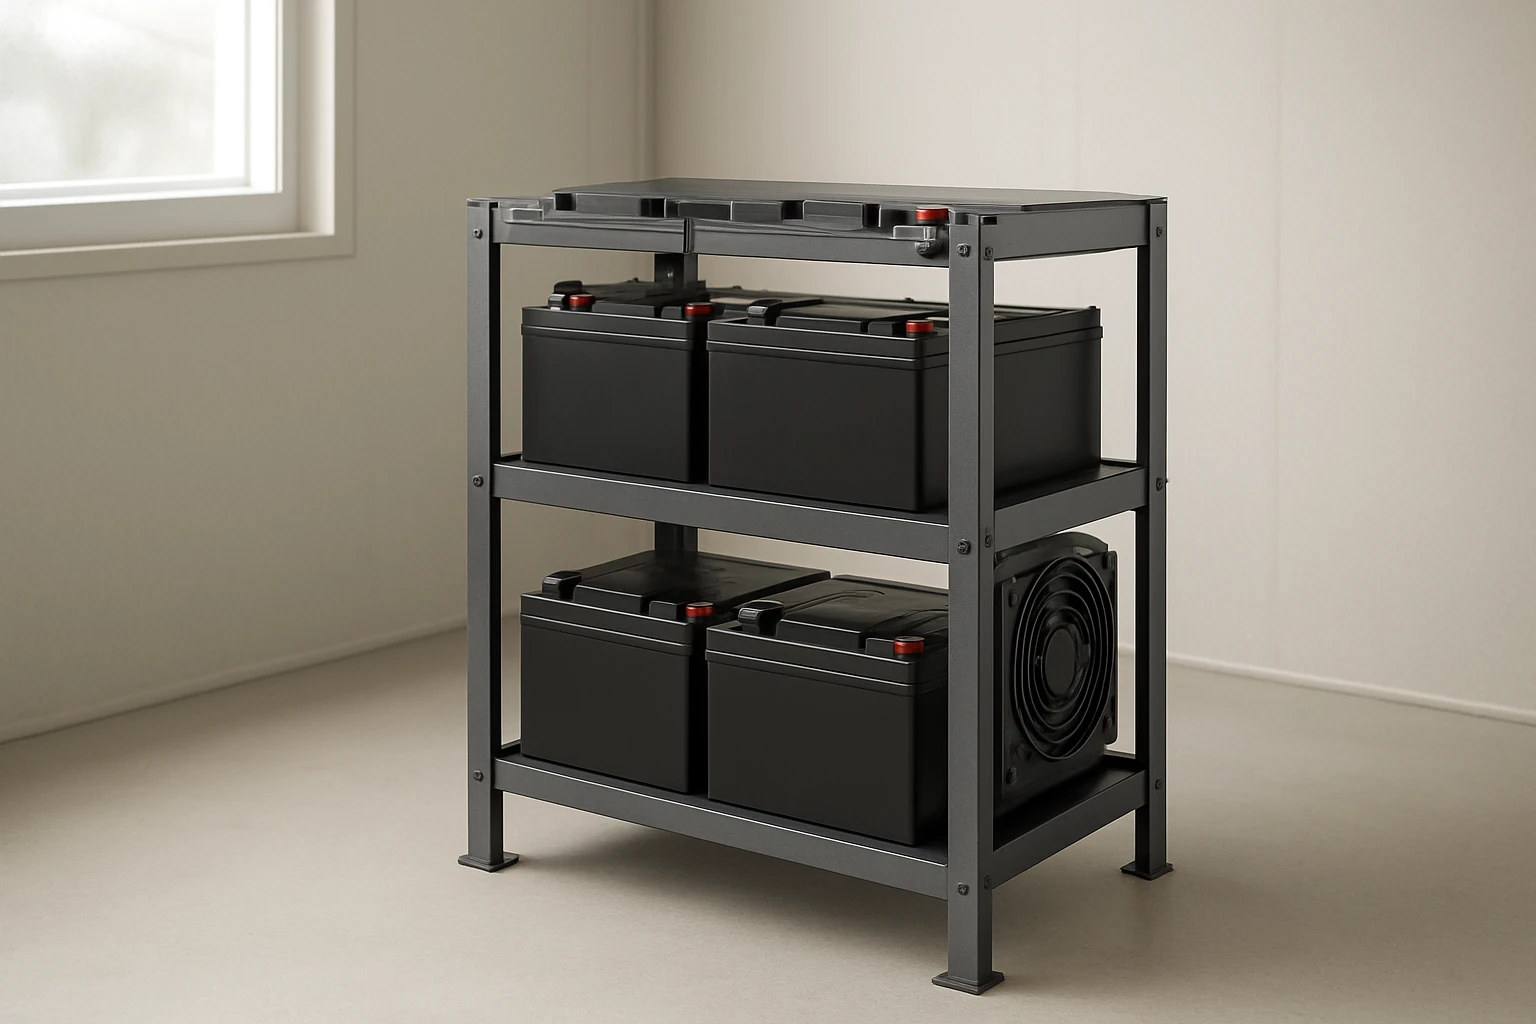
Step 3: Build a Sturdy Frame Using the Server Rack
Assemble the SUNGOLDPOWER 5‑Layer Server Rack according to the manufacturer's instructions. This rack is constructed from stainless steel, providing corrosion resistance and a load‑bearing capacity suitable for multiple 48 V 100 AH lithium batteries. Its five layers allow separation of batteries from other equipment, facilitating airflow between tiers. Secure the rack to the shelter wall using pre‑drilled mounting holes and stainless‑steel brackets to prevent shifting during transport.
The rack's open‑frame design creates natural channels for air to circulate. Position the rack so that the top layer faces upward, allowing warm air to rise and exit through the upper mesh grille. Install silicone grommets where cables penetrate the frame to maintain the enclosure's seal while preventing abrasion.
Step 4: Install the Adjustable Battery Tray Inside the Rack
Place the Wyckoff Adjustable Battery Tray on the middle shelf of the server rack. The tray, made from 5052 aluminum with a black anodized finish, weighs only 4 oz and resists corrosion, making it ideal for mobile applications. Its adjustable hold‑down strap secures batteries of varying sizes, preventing movement that could damage terminals.
Align the tray so that the strap runs parallel to the airflow direction; this orientation reduces turbulence and improves cooling efficiency. Use the pre‑drilled slots to bolt the tray to the rack, ensuring a rigid connection that will not loosen under vibration.
Step 5: Integrate the Tool Organizer for Cable Management
Mount the POKIPO Tool Organizer Wall Mount on the same wall as the battery rack, preferably at waist height. This organizer provides eight dedicated slots for cordless drills, a hammer, pliers, and additional wiring tools. Its heavy‑duty steel construction supports up to 400 lb, ensuring it can hold a full set of power tools without deformation.
Use the organizer to store cable ties, voltage meters, and spare connectors, keeping the work area tidy and reducing the risk of accidental short circuits. The proximity of tools to the battery rack simplifies maintenance and allows quick access during emergency inspections.
Step 6: Add Ventilation Components and Verify Air Flow
Cut openings in the shelter wall that align with the top of the server rack for passive mesh grilles. Install stainless‑steel mesh that can withstand outdoor exposure while allowing at least 10 % of the rack's surface area to vent. Mount a 12 V DC brushless fan on the rear side of the rack, directing airflow across the batteries toward the vented top.
Connect the fan to the battery system through a fused power line, and use a simple temperature‑controlled switch to activate the fan when battery temperature exceeds 40 °C. Verify airflow with a handheld anemometer; a flow rate of 0.5 m³/min per battery is a practical target. Adjust grille size or fan speed as needed to maintain temperatures between 20 °C and 35 °C during operation.
Tips & Pro Tips
- Apply a thin layer of thermal paste between the battery terminals and the aluminum tray to improve heat transfer.
- Use marine‑grade silicone sealant around vent openings to prevent water ingress while preserving airflow.
- Label each battery with its voltage and capacity; this simplifies monitoring and future expansion.
- Consider adding a small fire‑retardant blanket beneath the rack for an extra safety layer.
Troubleshooting
- Overheating despite ventilation: Check that the fan is receiving power and that the temperature switch is calibrated correctly. Increase grille size or add a second fan.
- Battery movement during transport: Tighten the hold‑down strap on the Wyckoff tray and add non‑slip rubber pads under the rack base.
- Corrosion on metal parts: Rinse the rack and tray with fresh water after exposure to salt spray, then dry thoroughly and reapply a light coat of corrosion‑inhibiting oil.
Conclusion
By following these six steps, one can design a portable battery rack that remains cool, stable, and easily maintainable within a tiny shelter. The combination of a stainless‑steel server rack, an adjustable aluminum tray, and a robust tool organizer creates a modular system that scales with future power needs. Proper ventilation, secure mounting, and thoughtful cable management together ensure safety and efficiency, allowing the user to focus on the tasks at hand rather than on equipment failures.
Products Mentioned in This Guide
Frequently Asked Questions
How do I calculate the power requirements for a portable battery rack in a tiny shelter?
Add the wattage of all devices you’ll run, then choose a battery capacity that provides at least 2‑3 hours of margin for safety.
What ventilation methods are best for preventing battery overheating?
Use a combination of mesh grilles for passive airflow and small DC fans to force air across the cells during high load.
Can I use a standard server rack for battery storage, and what modifications are needed?
Yes; reinforce the rack with sturdy brackets, install adjustable battery trays, and add vent panels or fans to improve cooling.
How should I secure the battery rack to avoid movement while on the road?
Mount the rack with bolts and silicone grommets to a rigid frame, and use tie‑downs or straps to lock it in place during transport.
What safety tools should be included in the rack’s tool organizer?
Include a fire‑proof blanket, a multimeter, a battery disconnect switch, and basic hand tools for quick maintenance.