How to Optimize Solar Panel Angle for Moving Vehicles: A Step‑by‑Step Guide to Maximize On‑the‑Go Solar Efficiency
Introduction
Travelers who rely on renewable energy often wonder how to capture the most sunlight while their vehicle is in motion. This guide explains the physics of solar incidence, demonstrates how to select appropriate hardware, and provides a detailed workflow for adjusting panel tilt on roofs, vans, boats and trailers. By following the instructions, the reader will be able to increase daily energy harvest by up to thirty percent, extend battery autonomy, and reduce dependence on fossil‑fuel generators.
The content is written for an intermediate audience who already understand basic photovoltaic concepts but require practical direction for mobile installations. The guide remains valuable even if the reader chooses not to purchase any recommended tools, yet the suggested products simplify each step and improve reliability.
What You’ll Need
- Solar panels suitable for mobile mounting (e.g., ECO‑WORTHY 400W Solar Panel Kit or Renogy 200W Solar Panel).
- Adjustable mounting hardware such as PFCTART Adjustable Solar Panel Mount Brackets or IRONDIY Solar Panel Z Bracket Set.
- Basic hand tools (drill, screwdriver, torque wrench).
- Electrical connectors, MC4 adapters, and appropriate gauge wiring.
- A portable power station for testing, such as the ZeroKor 300W Portable Solar Generator.
- Measuring devices (inclination protractor, multimeter, solar irradiance meter).
Step‑by‑Step Instructions
1. Assess the Vehicle Roof Geometry
The first task is to understand the shape, dimensions and load capacity of the roof. Measure the length, width and curvature of the surface. Identify any obstructions such as vents, antennae or roof racks that could cast shadows. Record the maximum permissible weight; most RV roofs support between 30 kg and 50 kg per square meter.
For a typical Class B van, the roof area is roughly 1.8 m × 1.2 m, providing sufficient space for two 200 W panels or one 400 W kit. If the vehicle is a boat with a low‑profile deck, a lighter mounting solution is advisable.
Why this matters: The angle of incidence is directly affected by roof curvature. A flat surface allows a simple tilt mechanism, whereas a curved surface may require flexible brackets such as the PFCTART Adjustable Solar Panel Mount Brackets, which can be set from 0° to 90° without tools.
2. Choose the Appropriate Solar Panel
Select a panel that matches the vehicle’s power budget and mounting area. The ECO‑WORTHY 400W Solar Panel Kit offers four 100 W monocrystalline modules, each rated at 23 % efficiency and equipped with pre‑installed bypass diodes for low‑light performance. Priced at $176.40 and rated 4.5/5 stars from 1,208 reviews, this kit provides a cost‑effective solution for larger roofs.
If space is limited, the Renogy 200W Solar Panel delivers 25 % cell efficiency, operates at 24 V, and includes a compact frame that weighs less than comparable 200 W panels. It is priced at $135.99 with a 4.6/5‑star rating from 7,184 reviews, making it an excellent choice for vans and small boats.
Both products include plug‑and‑play connectors, reducing the need for custom wiring. The ECO‑WORTHY kit includes 35‑inch cables and a waterproof IP65 junction box, while the Renogy panel ships with pre‑attached solar leads compatible with Renogy adaptor kits.
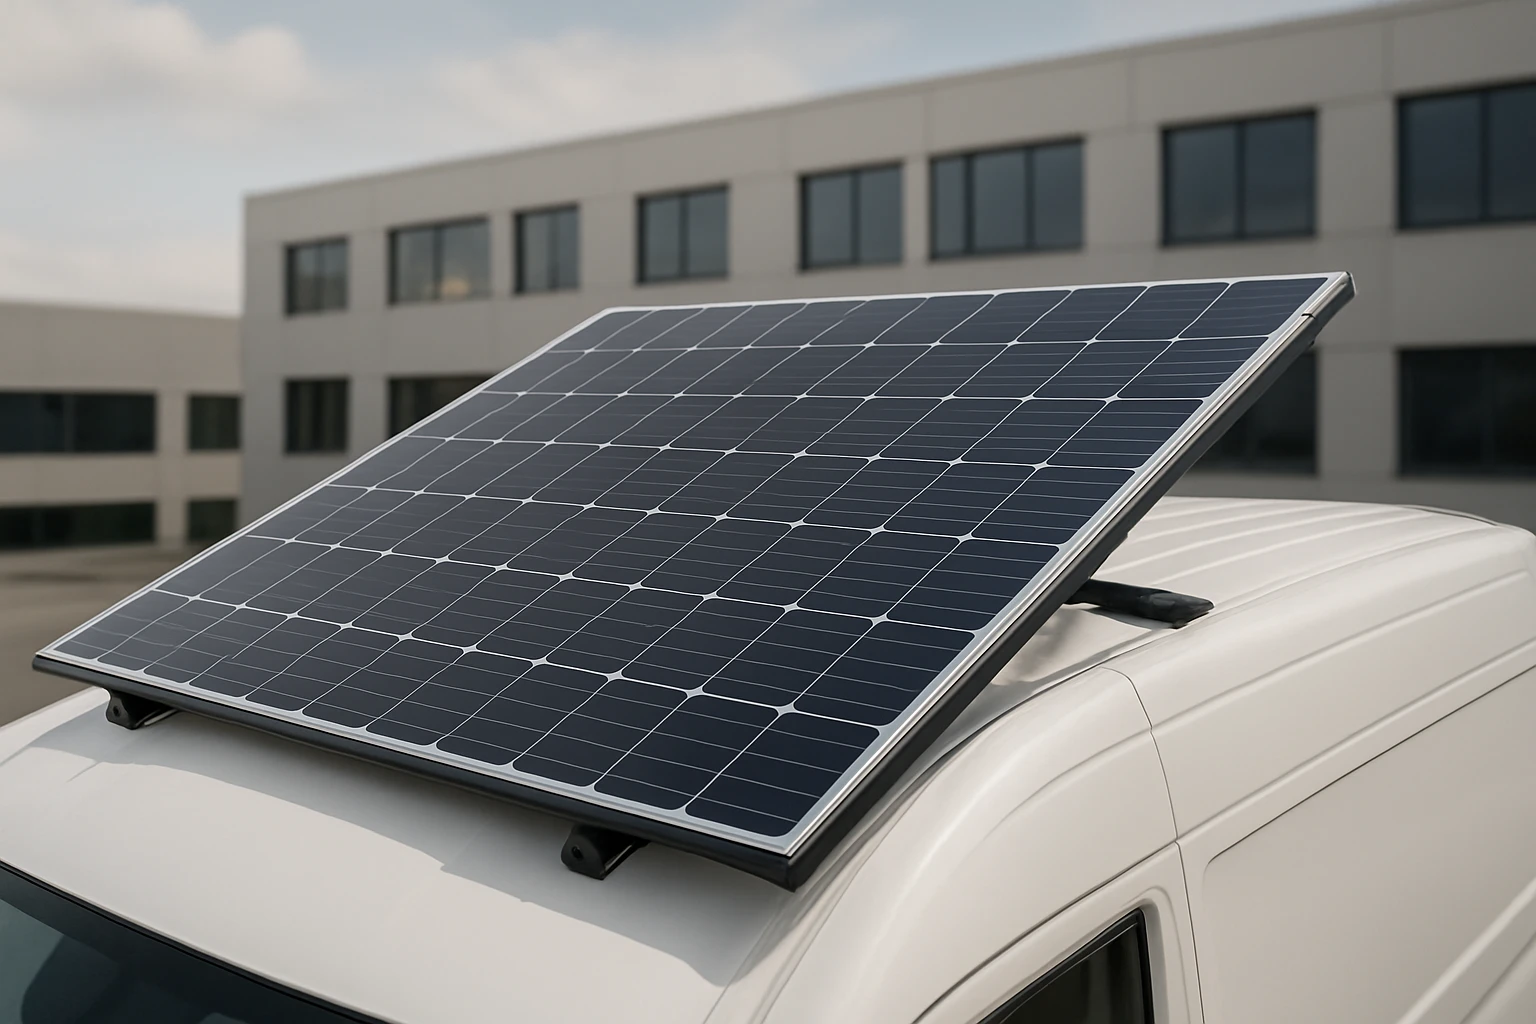
3. Install Adjustable Mounting Brackets
Secure the chosen brackets to the roof using the supplied hardware. For larger panels, the PFCTART Adjustable Solar Panel Mount Brackets provide high‑strength aluminum rails, corrosion resistance, and a tilt range of 0‑90°. The package includes eight 45‑inch rails, angle‑adjustment rails, knurled screws, wing nuts and self‑tapping screws. The set costs $64.99 and holds a 4.6/5‑star rating from 140 reviews.
When mounting on irregular surfaces such as a camper trailer, the IRONDIY Solar Panel Z Bracket Set offers a bent‑design that conforms to non‑flat roofs. Constructed from lightweight aluminum alloy, the brackets support 50‑150 W panels and are priced at $18.99 with a 4.7/5‑star rating from 90 reviews.
Installation steps:
- Mark the bracket locations based on the measurements from Step 1.
- Drill pilot holes through the pre‑drilled holes in the rails.
- Secure the rails with the supplied M6 hex screws and wing nuts, tightening to the manufacturer’s torque specification.
- Attach the angle‑adjustment rails and set the initial tilt to 30° (a good compromise for mid‑latitude travel).
Why these brackets are recommended: The PFCTART system is torsion‑resistant and can bear the wind load of a moving vehicle, while the IRONDIY Z brackets reduce weight and simplify installation on curved surfaces.
4. Determine the Optimal Tilt Angle for Travel
The optimal angle varies with latitude, season and vehicle orientation. A practical rule of thumb for mobile applications is to set the panel tilt equal to the vehicle’s latitude plus or minus ten degrees, allowing the sun to strike the panel during most of the day while the vehicle is stationary.
For a vehicle traveling across the United States, an adjustable range of 15°–45° covers the majority of latitudes (23°N to 49°N). Use an inclination protractor to verify the angle after mounting. The PFCTART brackets enable quick adjustment without tools, making it possible to fine‑tune the tilt before each trip.
If the vehicle is frequently on the move, consider a motorized tracking mount; however, such systems add weight and complexity and are beyond the scope of this guide.
5. Wire the Panels to the Charge Controller
Connect the panel strings to a Maximum Power Point Tracking (MPPT) charge controller that matches the system voltage. For a 12 V battery bank, the Renogy 200 W panel (24 V) can be wired in series with a step‑down MPPT controller. For the ECO‑WORTHY 400 W kit, connect the four 12 V panels in parallel to a 12 V MPPT controller.
Use MC4 connectors supplied with the panels, ensuring polarity is correct. Route the cables through a waterproof conduit to protect them from road spray and dust. Secure the conduit with zip ties and silicone sealant at entry points.
Testing: Before sealing the system, measure open‑circuit voltage (Voc) and short‑circuit current (Isc) with a multimeter. Verify that the values are within the controller’s specifications.
6. Integrate a Portable Power Station for Load Management
While the solar array charges the vehicle’s battery, a portable power station can supply high‑power loads during travel. The ZeroKor 300W Portable Solar Generator includes a 280 Wh lithium‑ion battery, two 300 W AC outlets, a DC port, multiple USB ports, and a built‑in MPPT solar charger. Priced at $177.88 with a 4.3/5‑star rating from 1,579 reviews, it serves as an intermediary buffer between the solar array and onboard appliances.
Connect the generator to the battery bank using the DC input port. The generator can also be recharged from the solar panels directly, providing redundancy if the main charge controller fails. Its built‑in protection mechanisms (over‑current, over‑voltage, short‑circuit) safeguard both the generator and the vehicle’s electrical system.
7. Test System Performance Under Real‑World Conditions
After installation, perform a full‑day test. Record the energy harvested at sunrise, midday and sunset using the charge controller’s data logging feature. Compare the measured output with the panel’s rated 1600 Wh (ECO‑WORTHY) or 320 Wh (Renogy) under four hours of peak sunlight.
If the output falls below 70 % of the expected value, re‑examine shading, cable losses and connector integrity. Adjust the tilt angle by a few degrees and repeat the measurement to identify the most productive orientation.
Document the final tilt setting for future trips; many owners keep a small angle‑marker sticker on the bracket to expedite re‑adjustment.
Tips & Pro Tips
- Clean the panel surface regularly; dust reduces efficiency by up to 10 %.
- Use anti‑theft bolts when mounting on public parking areas.
- Install a small wind deflector on the bracket to reduce drag at highway speeds.
- When traveling in hot climates, orient the panels slightly away from direct noon sun to avoid overheating, which can lower voltage.
- Consider adding a small battery monitor to track state‑of‑charge in real time.
Troubleshooting
| Problem | Possible Cause | Solution |
|---|---|---|
| Low output despite clear sky | Shading from roof accessories | Reposition brackets or trim obstructing objects. |
| Intermittent voltage drop | Loose MC4 connectors | Inspect and reseat all connectors; apply dielectric grease. |
| Excessive heat on panels | Insufficient airflow | Increase tilt angle or add ventilation gaps. |
Conclusion
Optimizing solar panel angle on moving vehicles involves careful assessment of roof geometry, selection of efficient panels, installation of robust adjustable brackets, and precise wiring to a suitable charge controller. By following the steps outlined above, the reader can increase solar harvest, extend battery life, and rely less on fossil‑fuel generators during travel. The recommended tools—ECO‑WORTHY 400W Solar Panel Kit, Renogy 200W Solar Panel, PFCTART Adjustable Solar Panel Mount Brackets, IRONDIY Solar Panel Z Bracket Set, and ZeroKor 300W Portable Solar Generator—provide reliable performance and simplify the installation process.
Implement the guide on the next road trip, and experience the freedom of clean, on‑the‑go power.
Products Mentioned in This Guide
Frequently Asked Questions
What is the ideal tilt angle for a solar panel on a moving vehicle?
Aim for the latitude‑adjusted angle plus 10‑15° to compensate for vehicle motion and maximize sunlight exposure.
How often should I adjust the panel angle while traveling?
Adjust every 1‑2 hours or when the sun moves more than 30° across the sky to maintain optimal incidence.
Do I need a tracking system for a mobile solar setup?
A simple manual or motorized tilt mechanism can improve efficiency by 10‑20% without the complexity of full dual‑axis tracking.
Will a higher‑profile panel reduce efficiency on a vehicle?
Yes, larger panels increase wind drag and may cast shadows on themselves, lowering output; choose low‑profile, flexible panels for mobile use.
How does vehicle orientation (heading) influence panel performance?
Facing the panel toward the sun’s azimuth (generally east‑west on highways) yields the best harvest; rotate the panel or vehicle when safe to do so.