Introduction
In this guide, one will learn how to dismantle a portable power station, remove individual lithium‑ion cells, and evaluate their health for reuse. The process is valuable for hobbyists, repair technicians, and sustainability‑focused users who wish to extend the life of expensive battery modules. By following each step, one can avoid hazardous short circuits, preserve cell capacity, and reduce electronic waste. The instructions balance thorough safety measures with practical techniques that can be performed in a modest home workshop.
What You'll Need
- Safety equipment: insulated gloves, safety glasses, and a flame‑resistant mat.
- Precision screwdrivers (Phillips and Torx) for opening the enclosure.
- Multimeter with a 20 V DC range for voltage checks.
- Programmable electronic load or resistor bank for safe discharge.
- Bailibatt 600W Portable Power Station – provides clean AC power for tools and a stable 120 V outlet for the electronic load. Price: $259.99, Rating: 4.4/5 (338 reviews).
- Anker SOLIX C300 Power Station – useful for quick USB‑C PD charging of a portable cell tester. Price: $169.99, Rating: 4.5/5 (2,411 reviews).
- Soldering iron with fine tip and desoldering braid.
- Cell holder or battery management system (BMS) for post‑extraction testing.
Step 1: Safety Precautions and Workspace Preparation
Before touching any component, one must disconnect the power station from all external sources and place it on a non‑conductive, flame‑resistant mat. Wear insulated gloves and safety glasses to protect against accidental short circuits or battery venting. Verify that the work area is well‑ventilated, as lithium cells can emit hazardous gases if punctured. Finally, ensure that a fire‑extinguishing blanket or Class D extinguisher is within arm’s reach.
Step 2: Discharging the Power Station
The internal battery pack must be fully discharged to eliminate stored energy that could cause a shock. Connect the Bailibatt 600W Portable Power Station to a programmable electronic load via its 120 V AC outlet using a suitable AC‑to‑DC adapter. Set the load to draw approximately 100 W until the station indicates 0 % charge on its LCD screen. This controlled discharge prevents thermal runaway and ensures the cells are at a safe voltage (< 3.0 V per cell) before removal.
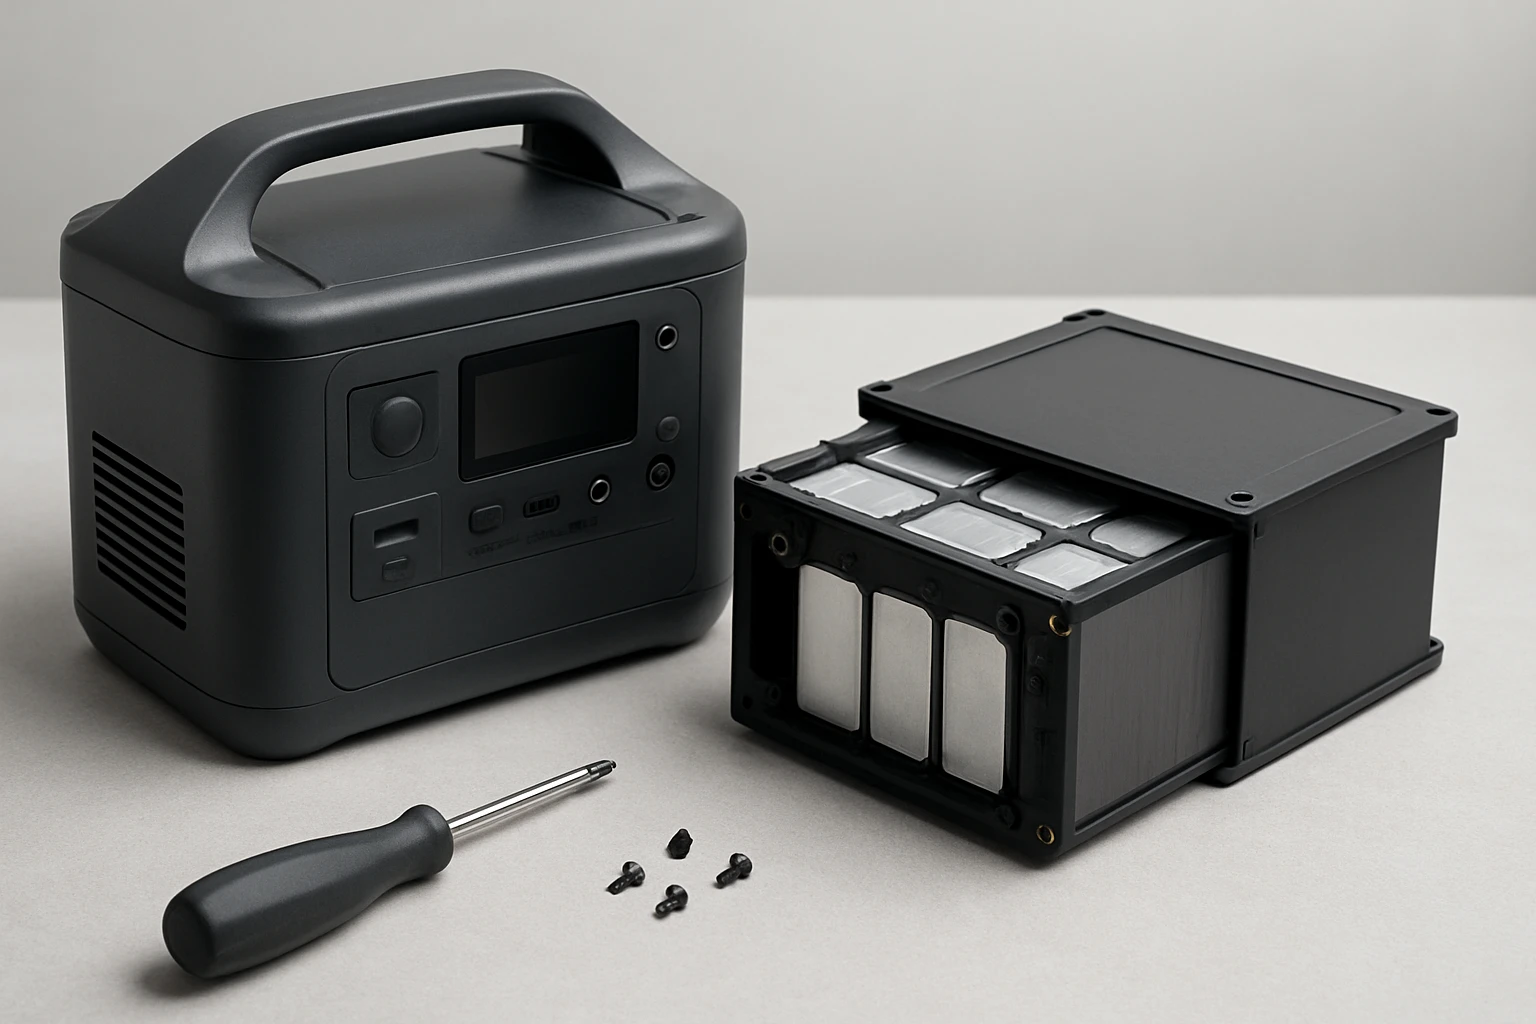
Step 3: Removing the Outer Casing
With the device fully discharged, locate the screws securing the enclosure; most models use a combination of Phillips and Torx fasteners. Using the precision screwdriver set, remove each screw and gently pry the casing apart, taking care not to stress internal connectors. Keep the screws organized in a magnetic tray for reassembly if desired. If the casing is sealed with adhesive, apply gentle heat (no more than 40 °C) using a heat gun to soften the glue before prying.
Step 4: Identifying Battery Modules
Inside the power station, the battery pack is typically composed of several series‑connected modules, each containing multiple parallel cells. Document the layout with photos before proceeding. The modules are often held in plastic trays with metal brackets; remove any securing clips using the screwdriver. At this stage, the Anker SOLIX C300 Power Station can be employed to power a portable USB‑C cell tester, allowing quick verification of cell voltage without a bench‑top power supply.
Step 5: Extracting Individual Cells
Each cell is usually spot‑welded to a bus bar. Use a soldering iron with a fine tip to melt the weld points, and employ desoldering braid to remove excess solder. Gently lift the cell from the bus bar; if resistance is encountered, apply a small amount of heat to the joint rather than forcing the cell. Place extracted cells in an anti‑static bag immediately to prevent accidental shorting. Label each cell with its original position (e.g., “Cell A‑1”) to aid future rebalancing.
Step 6: Testing Extracted Cells
Connect each cell to a digital multimeter set to DC voltage. Cells that read below 2.5 V are likely degraded and should be recycled. For cells within the 3.0‑4.2 V range, perform a capacity test using a programmable load set to a 0.5 C discharge rate. The Anker SOLIX C300 Power Station can supply the required 100 W USB‑C PD output to power a portable charger that logs discharge curves, providing a convenient alternative to a benchtop charger.
Step 7: Repackaging and Storage
Store healthy cells in a fire‑proof container at a temperature of 15‑25 °C, ideally at 40 % state‑of‑charge to minimize self‑discharge. Use the original plastic trays if available, or purchase a dedicated battery storage box. Record the capacity test results in a spreadsheet for future reference. Dispose of any damaged cells according to local hazardous waste regulations; many municipalities accept lithium batteries at designated recycling centers.
Tips & Pro Tips
- Always work in a well‑lit area; a headlamp can free both hands for delicate soldering.
- When using the Bailibatt 600W Portable Power Station as a power source, engage the pure sine‑wave AC outlet to avoid introducing harmonic distortion into the electronic load.
- Label each cell with both its original series position and its measured capacity; this simplifies building balanced replacement packs.
- If a cell shows swelling, discard it immediately; swelling indicates internal pressure that can lead to rupture.
- Consider using a dedicated BMS when reassembling cells into a new pack; the BMS will protect against over‑charge, over‑discharge, and temperature excursions.
Troubleshooting
| Problem | Possible Cause | Solution |
|---|---|---|
| Cell voltage does not rise during charging | Dead cell or high internal resistance | Replace the cell; test with a low‑current charger to confirm. |
| Unexpected heat during discharge test | Improper load setting or shorted cell | Reduce discharge current and verify connections with a multimeter. |
| Solder joint refuses to melt | Insufficient heat or high‑quality weld | Increase iron temperature to 350 °C and use a larger tip; apply flux sparingly. |
Conclusion
By following this structured approach, one can safely salvage usable lithium cells from a portable power station, test their health, and store them for future projects. The guide emphasizes safety, proper discharge, and accurate testing, ensuring that reclaimed cells perform reliably when repurposed. Whether the goal is to build a custom power bank or simply reduce electronic waste, the techniques described empower users to extract value from otherwise discarded equipment.
Products Mentioned in This Guide
Frequently Asked Questions
Is it safe to dismantle a portable power station for battery cell salvage?
Yes, if you wear insulated gloves, safety glasses, work on a flame‑resistant mat, and follow proper discharge procedures to avoid short circuits.
What basic tools are required to remove lithium‑ion cells from a power station?
You need precision Phillips/Torx screwdrivers, a multimeter (20 V DC range), and a programmable electronic load or resistor bank for safe discharge.
How do I safely discharge the battery pack before removal?
Connect the pack to a programmable electronic load set to a low current and discharge to below 0.5 V per cell, monitoring voltage with a multimeter.
What is the best way to check the health of salvaged cells?
Measure each cell's open‑circuit voltage and perform a capacity test with a controlled load, comparing results to the cell’s rated capacity.
Can salvaged cells be reused in other projects?
Yes, cells that retain >80% capacity and show no swelling or high internal resistance can be repurposed in DIY packs or hobby projects.